Contents
- Outline of Linked List
- Node
- LinkedList
- Adding values to the list
- Push
- Append
- insert(after:)
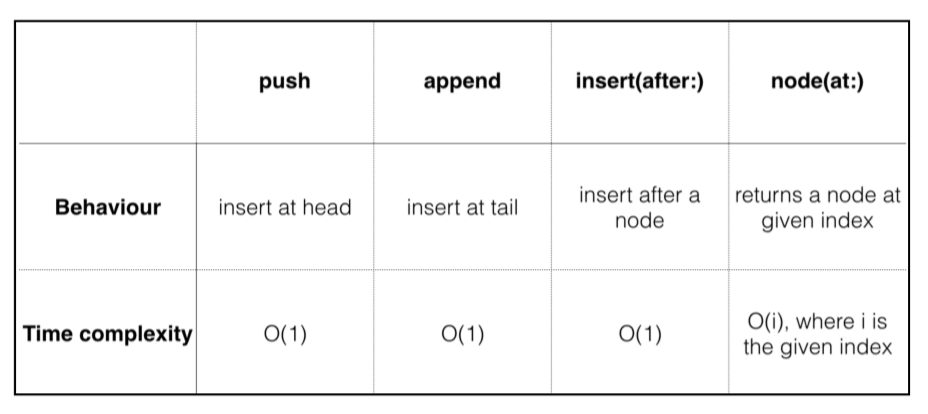
- Performance analysis
- Removing values from the list
- pop
- removeLast
- remove(after:)
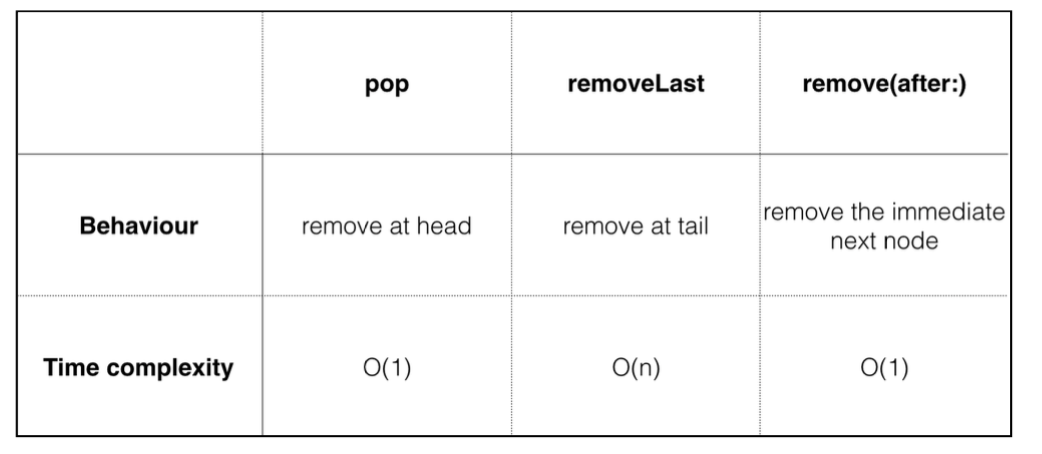
- Performance analysis
Outline of Linked List
Linked List는 선형 단방향 시퀀스로 정렬된 값의 모음 입니다. Linked List는 Swift의 Array와 같은 인접한 저장 옵션보다 몇가지 이론적인 이점이 있습니다.
- 리스트의 맨 앞에 추가와 삭제시 일정한 시간 소요
- 신뢰할 수 있는 성능 특정
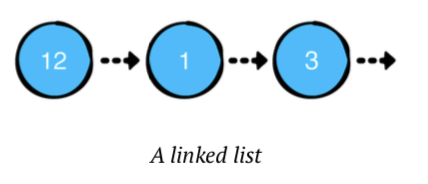
위의 이미지에서 다이어그램의 각 노드들로 구성 되어 있습니다. 각 노드들은 각자의 역활이 있습니다.
- 값을 가지고
- 다음 노드에 대한 촘조를 가집니다.
nil값은 리스트의 끝을 나타냅니다
Node
// helper
public func example(of description: String, action: () -> Void) {
    print("---Example of \(description)---")
    action()
    print()
}

// 1
public class Node<Value>{
    public var value: Value
    public var next: Node?

    public init(_ value: Value, next: Node? = nil) {
        self.value = value
        self.next = next
    }
}

// 2
extension Node: CustomStringConvertible {
    public var description: String {
        guard let next = next else {
            return "\(value)"
        }
        return "\(value) -> " + String(describing: next) + " "
    }
}
아래에 실행 코드를 추가합니다
example(of: "creating and linking nodes") {
  let node1 = Node(value: 1)
  let node2 = Node(value: 2)
  let node3 = Node(value: 3)
  node1.next = node2
  node2.next = node3
  print(node1)
}

---Example of creating and linking nodes---
1 -> 2 -> 3
위의 코드는 실용적인 것과 거리가 멉니다. 이런식으로 긴 Node를 연결하여 작성하는 것은 비 실용적이라는 것을 알게 됩니다. 이 문제를 해결하는 일반적인 방법은 Node 객체를 관리하는 Linked List를 만드는 것입니다.
LinkedList
// 1
public struct LinkedList<Value> {
  public var head: Node<Value>?
  public var tail: Node<Value>?
  public init() {}
  public var isEmpty: Bool {
    return head == nil
  }
}

// 2
extension LinkedList: CustomStringConvertible {
  public var description: String {
    guard let head = head else {
      return "Empty list"
    }
    return String(describing: head)
  }
}
위의 Linked List는 head와 tail을 가집니다. 각 리스트의 노드에 첫번째와 마지막 값을 참조(refer)합니다.
Adding values to the list
Linked List에 값을 추가하는 세가지 방법이 있습니다. 각 방법은 각 자신만의 특징이 있습니다.
- push: 리스트의 맨 앞에 값을 추가합니다.
- append: 리스트의 맨 끝에 값을 추가합니다.
- insert(after:): 특정 노드 뒤에 값을 추가합니다.
Push
리스트의 맨 앞에 값을 추가하는것은 head-first insertion 이라고 알려져 있습니다.
// 1
public mutating func push(_ value: Value) {
    // 현재의 head에 새로운 node를 삽입하고, head의 next를 기존에 head에 있던 값d으로 지정
    head = Node.init(value, next: head)
    // 맨 처음 값을 넣은 케이스이다. head, tail이 같은 곳을 가리키고 있습니다
    if tail == nil {
        tail = head
    }
}

// 2
example(of: "push") {
  var list = LinkedList<Int>()
  list.push(3)
  list.push(2)
  list.push(1)
  print(list)
}

// 3
---Example of push---
1 -> 2 -> 3
Append
리스트의 맨끝에 값을 추가하는것은 tail-end insertion으로 알려져 있습니다.
// 1
public mutating func append(_ value: Value) {
    // 만약 비어있다면(=맨 처음 값을 넣을때), 새롭게 추가된 값이 head, tail이 참조 해주어야 하기때문에, push랑 같은 방식입니다. 그래서 push 호출합니다.
    guard !isEmpty else {
        push(value)
        return
    }
    /* guard문 이후라, forced casting
    현재의 tail의 Next 값에 새로운 값을 추가하고, tail을 새롭게 추가된 값으로 다시 참조 합니다.
     */
    tail!.next = Node.init(value)
    // 3
    tail = tail!.next
}

// 2
example(of: "append") {
  var list = LinkedList<Int>()
  list.append(1)
  list.append(2)
  list.append(3)
  print(list)
}

// 3
---Example of append---
1 -> 2 -> 3
insert(after:)
insert(after:)는 값을 리스트의 특정 장소에 넣습니다(insert). 이때 다음 두가지가 요구 됩니다.
- 리스트에서 특정 노드를 찾습니다
- 새로운 노드를 추가합니다(insert)
// 1
/**
     특정 위치의 Node를 찾기위한 method
     Node들의 Index 값을 넣으면, 해당 인덱스에 값이 있는지 없는지를 확인후, Node를 반환함.
     */
    public func node(at index: Int) -> Node<Value>? {
        // 1: head와 현재 Index
        var currentNode = head
        var currentIndex = 0

        // 2: 현재 노드에서부터, 다음 노드를 순회하며, 대상 Node의 Index에 어떤 값이 있는지확인..
        while currentNode != nil && currentIndex < index {
            currentNode = currentNode!.next
            currentIndex += 1
        }
        return currentNode
    }

// 2
    /**
     LikedList내부에 있는 Node와 값을 넣으면, 해당 노드 뒤에 값을 추가함..
     */
    @discardableResult
    public mutating func insert(_ value: Value, after node: Node<Value>) -> Node<Value> {
        guard tail !== node else {
            append(value)
            return tail!
        }
        node.next = Node(value, next: node.next)
        return node.next!
    }

// 3
example(of: "inserting at a particular index") {
  var list = LinkedList<Int>()
  list.push(3)
  list.push(2)
  list.push(1)
  print("Before inserting: \(list)")
  var middleNode = list.node(at: 1)!
  for _ in 1...4 {
    middleNode = list.insert(-1, after: middleNode)
  }
  print("After inserting: \(list)")
}

// 4
---Example of inserting at a particular index---
Before inserting: 1 -> 2 -> 3
After inserting: 1 -> 2 -> -1 -> -1 -> -1 -> -1 -> 3
Performance analysis
Removing values from the list
노드를 지우기 위한 방법에는 주요한 3가지 방법이 있습니다
- pop: 리스트의 맨 앞에 있는 값을 지웁니다.
- removeLast: 리스트의 맨 끝에 있는 값을 지웁니다.
- remove(after:): 리스트 어딘가에 위치한 값을 지웁니다.
pop
push 의 방법과 비슷하게 생각해볼수 있습니다.
// 1
/*
 head의 참조를 next로 이동시킵니다. 이때 head, tail이 같은 node를 가르키고 있는경우(Node가 1개)에는 head와 tail 모두 nil로 만들어줌
 */
@discardableResult
public mutating func pop() -> Value? {
    guard head != nil else { return nil }
    head = head?.next
    if isEmpty {
        tail = nil
    }

    return head?.value
}

// 2
example(of: "pop") {
  var list = LinkedList<Int>()
  list.push(3)
  list.push(2)
  list.push(1)
  print("Before popping list: \(list)")
  let poppedValue = list.pop()
  print("After popping list: \(list)")
  print("Popped value: " + String(describing: poppedValue))
}

// 3
---Example of pop---
Before popping list: 1 -> 2 -> 3
After popping list: 2 -> 3
Popped value: Optional(1)
해당 메소드가 종료되면 이전 노드를 메모리에서 제거 합니다.
removeLast
리스트의 마지막 목록을 제거하는것은 조금 불편합니다. 이유는 마지막 노드에 대한 참조는 있지만 그 앞의 노드에 대한 참조가 없으면 리스트의 마지막 노드를 지울수 없기 때문입니다(tail의 참조를 앞으로 옮기고, 이전 노드의 참조를 끊어주어야함)
// 1
public mutating func removeLast() -> Value? {
    guard let head = head else { return nil }
    guard head.next != nil else { return pop() }

    var prev = head
    var current = head

    // head에서 출발해서 현재값, 다음값을 차례로 가져와서 마지막 next값을 nil면 while let문 종료, tail을 next이전 값으로 가리키고, 지운값을 반환합니다.
    while let next = current.next {
        print("next: \(next),\nprev: \(prev),\ncurrent: \(current)")
        prev = current
        current = next
    }
    prev.next = nil
    tail = prev
    return current.value
}

// 2
example(of: "removing the last node") {
  var list = LinkedList<Int>()
  list.push(3)
  list.push(2)
  list.push(1)
  print("Before removing last node: \(list)")
  let removedValue = list.removeLast()
  print("After removing last node: \(list)")
  print("Removed value: " + String(describing: removedValue))
}

// 3
---Example of removing the last node---
Before removing last node: 1 -> 2 -> 3
After removing last node: 1 -> 2
Removed value: Optional(3)
remove(after:)
특정 노드 이후의 노드를 삭제합니다.

// 1
public mutating func remove(after node: Node<Value>) -> Value? {
    if node.next === tail { tail = node }
    node.next = node.next?.next
    return node.next?.value
}

// 2
example(of: "removing a node after a particular node") {
  var list = LinkedList<Int>()
  list.push(3)
  list.push(2)
  list.push(1)
  print("Before removing at particular index: \(list)")
  let index = 1
  let node = list.node(at: index - 1)!
  let removedValue = list.remove(after: node)
  print("After removing at index \(index): \(list)")
  print("Removed value: " + String(describing: removedValue))
}

// 3
---Example of removing a node after a particular node---
Before removing at particular index: 1 -> 2 -> 3
After removing at index 1: 1 -> 3
Removed value: Optional(2)
Performance analysis
Reference
swift-algorithm-club/Linked List
Data Structures and Algorithms in Swift