Contetns
- chpater 19: Graph
- Weighted graphs
- Directed graphs
- Undirected graphs
- Common operations
- Defining a vertex
- Defining an edge
- Adjacency list
- Implemenetation
- Creating a vertex
- Creating a directed edge
- Creating an undirected edge
- Retrieving the outgoing edges from a vertex
- Retrieving the weight of an edge
- Visualizing the adjacency list
- Building a network
- Adjacency matrix
- Implementation
- Creating a Vertex
- Creating edges
- Retrieving the outgoing edges from a vertex
- Visualize an adjacency matrix
- Building a network
- Graph analysis
- 더 알아보면 좋은것
- Referece
Graph
소셜 네트워크는 전세계 저렴한 항공편을 예약하는 것과 어떤 공통점이 있나요? 이 두개의 실제 모델을 그래프로 나타낼수 있습니다.
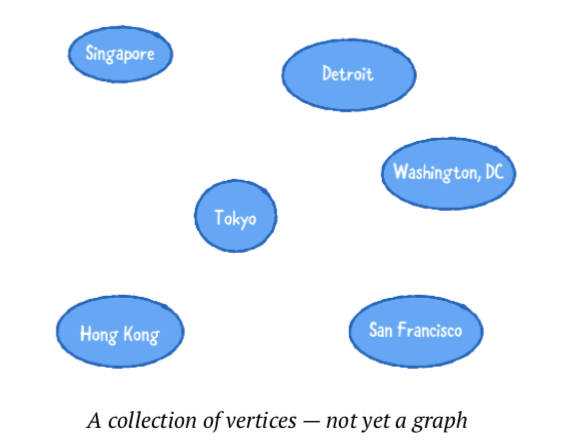
그래프는 오프젝트 사이의 관계된것을 잡아내는 데이터 구조입니다. 그것은 꼭지점(vertices)이 모서리(edges)에 의해서 연결되어 만들어집니다.
아래의 그래프에서, vertices 는 원으로 표시되어지고, edges는 원이 연결된 선으로 표현됩니다.

Weighted graphs(가중치 그래프들)
가중치 그래프에서(In a weighted graph) 모든 모서리에는 이 모서리를 사용하는 비용을 나타내는 연관된 가중치 값이 있습니다. 이렇게하면 두개의 꼭지점(verices)사이에서 가장 싼 경로 혹은 가장 짧은 경로를 선택할수 있습니다.
예를 들어 항공 산업을 예를 들자면 다양한 항공 운항 네트워크를 생각해보세요.
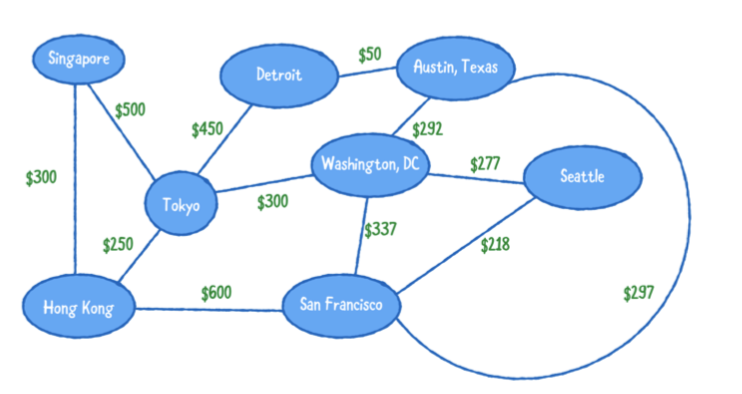
이 예에서, 각 꼭지점은 나라 또는 주를 나타내고 모서리는 어떤 장소에서 다른 장소의 경로를 나타냅니다. 각 모서리의 연관된 가중치는(the weight) 두 지점의 항공료를 나타냅니다.
이 네트워크를 사용하는 것, 샌프란시스코에서 싱가포르에 도착하는 저렴한 예산의 항공편을 찾을수 있습니다.
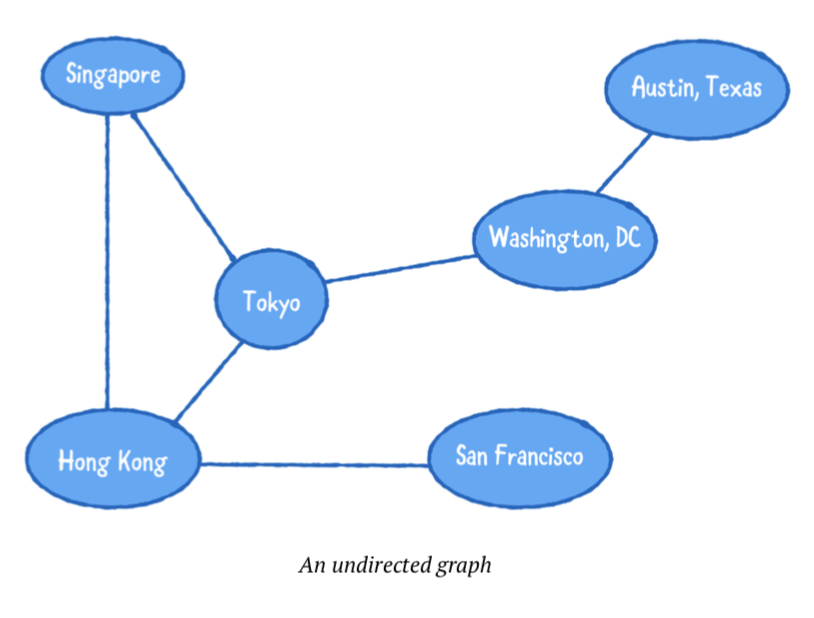
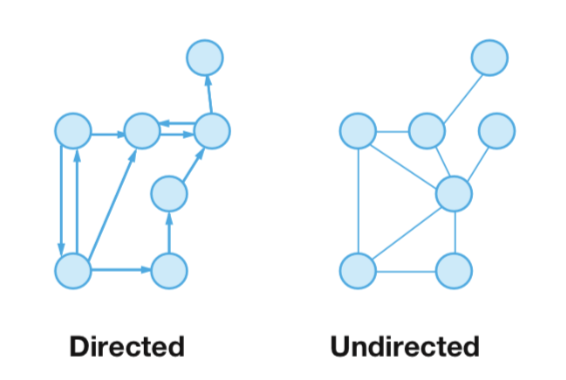
Directed graphs
모서리에 가중치를 할당하는것 뿐아니라, 그래프에 방향성(direction) 가질수 있게 할수 있습니다. 방향이 지정된 그래프(Directed graphs)는 한 방향으로의 탐색만 허용 하므로 순회에 더 제한적입니다.
아래의 다이어그램은 방향 지정된 그래프 입니다.

이 다이어그램으로부터 많은것들을 말할수 있습니다
- 홍콩에서 도쿄로 가는 항공편이 있습니다
- 샌프란시스코에서 도쿄방향으로 가는 직항 항공편 없습니다
- 싱가폴과 도쿄를 오가는 왕복 티켓을 살수 있습니다.
- 도쿄에서 샌프란시스코까지 가는 길은 없습니다.
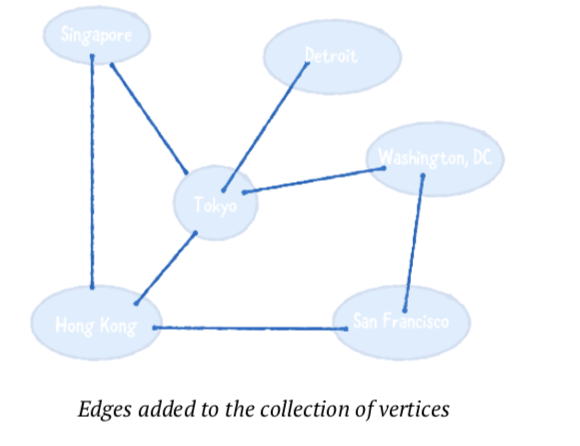
Undirected graphs
directed graph 처럼, undirected graph를 생각해볼수 있습니다. undirected graph의 모든 모서리(edges)는 양방향성(bidirectional)을 가지고 있습니다.
- 두개의 연결된 꼭지점은 앞,뒤로 오갈수 있는 모서리가 있습니다.
- 모서리의 가중치는 두 방향 모두에 적용 시킵니다.
Common operations
그래프를 위한 프로토콜을 수립해봅니다
public enum EdgeType {
  case directed
  case undirected
}
public protocol Graph {
  associatedtype Element
  func createVertex(data: Element) -> Vertex<Element>
  func addDirectedEdge(from source: Vertex<Element>,
                       to destination: Vertex<Element>,
                       weight: Double?)
  func addUndirectedEdge(between source: Vertex<Element>,
                         and destination: Vertex<Element>,
                         weight: Double?)
  func add(_ edge: EdgeType, from source: Vertex<Element>,
                             to destination: Vertex<Element>,
                             weight: Double?)
  func edges(from source: Vertex<Element>) -> [Edge<Element>]
  func weight(from source: Vertex<Element>,
              to destination: Vertex<Element>) -> Double?
}
- createVertex(data:): 꼭지점을 생성하고 그것을 그래프에 추가합니다.
- addDirectedEdge(from:to:weight:): directed edge를 두개의 꼭지점 사이에 추가합니다.
- addUndirectedEdge(between:and:weight:): 두개의 꼭지점 사이에 양방향 모서리undirected(or bidirectional)를 추가합니다
- add(from:to):
edgeType를 사용하여 방향이 정해진 또는 양방향의 모서리를 두개의 꼭지점 사이에 추가합니다. - edges(from:): 특정 꼭지점에서 다른꼭지점으로 연결된 모서리들 목록을 반환합니다
- weight(from:to): 두 꼭지점 사이의 모서리 가중치를 반환합니다.
위의 프로토콜을 두가 방법을 통해서 구현합니다
- 이웃 목록(adjacency list)를 사용하여서
- 이웃 메트릭스(adjacency matrix)를 사용하여서
Defining a vertex
public struct Vertex<T> {
  public let index: Int
  public let data: T
}
제네릭 Vertex 구조체를 정의합니다. vertex는 그것의 그래프 이내에 유니크한 인덱스를 가지고, 데이터를 보유하고 있습니다.
Vertex는 딕셔너리의 키 타입으로 사용해야하므로 Hashable 프로토콜을 준수합니다. Hashable에 대한 요구사항을 구현하기 위해 다음 확장을 추가합니다.
extension Vertex: Hashable {
  public var hashValue: Int {
    return index.hashValue
  }
  public static func ==(lhs: Vertex, rhs: Vertex) -> Bool {
    return lhs.index == rhs.index
  }
}
꼭지점은 유니크한 index를 가지고, index 프로퍼티를 가지고 hashValue와 ==를 구현합니다.
마지막으로 CustomStringConvertible 프로토콜을 체텍하여 출력할 모양을 정의합니다
extension Vertex: CustomStringConvertible {
  public var description: String {
    return "\(index): \(data)"
  }
}
Defining an edge
두개의 꼭지점을 연결하는것과 두개의 꼭지점 사이에는 모서리가 있어야합니다.
public struct Edge<T> {
  public let source: Vertex<T>
  public let destination: Vertex<T>
  public let weight: Double?
}
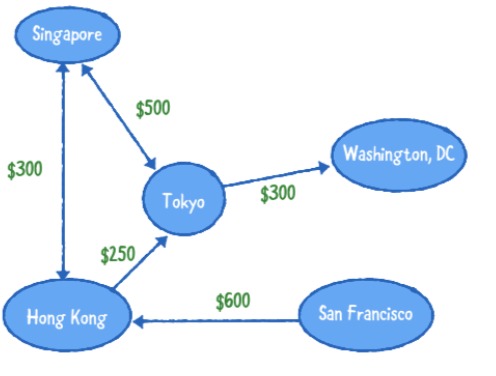
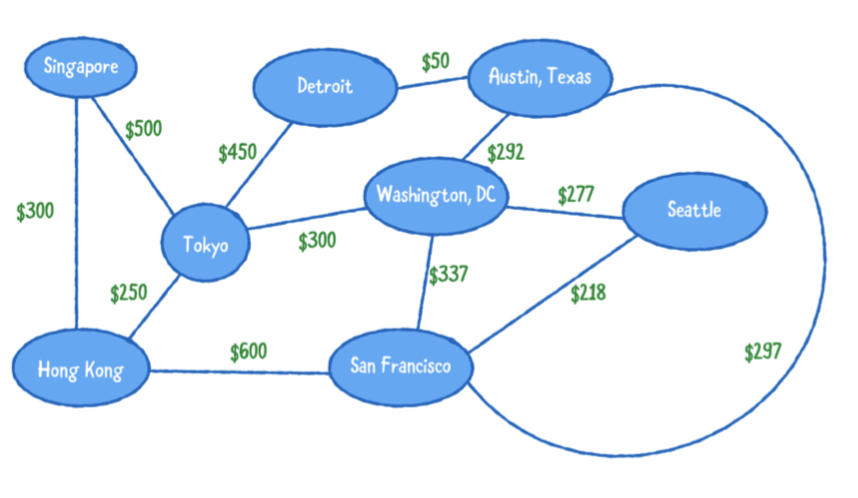
Adjacency list
첫 번째 그래프 구현에서는 인접 목록을 사용합니다. 그래프의 모든 꼭지점에 대해 그래프는 다른 꼭지점과 연결된 모서리의 목록을 저장합니다.
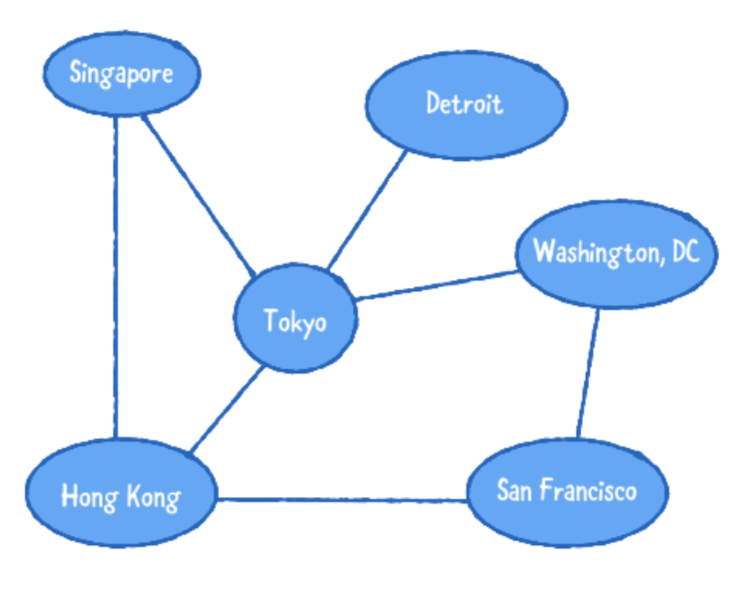
아래의 인접 목록은 위에 묘사 된 비행 네트워크를 설명합니다.
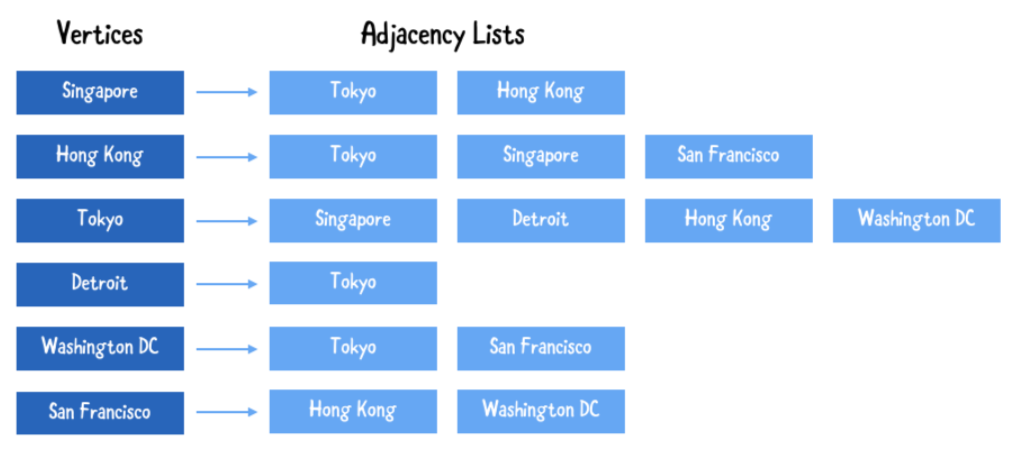
위의 인접 목록을 통해서 많은것을 배울수 있ㅅ브니다.
- 싱가폴의 꼭지점은 두개의 모서리를 가집니다.
- 디트로이는 가장작은 수의 출구를 가지고 있습니다.
- 도쿄는 가장 바쁜 공항이고, 대부분의 항공편과 연결되어 있습니다
배열 타입의 딕셔너리로 adjacency list를 정의합니다. 각 키는 꼭지점이고, 모든 꼭지점은 모서리의 배열에 대응됩니다.
Implemenetation
public class AdjacencyList<T>: Graph {
  private var adjacencies: [Vertex<T>: [Edge<T>]] = [:]
  public init() {}
  // more to come ...
}
여기서 사전을 사용하여 모서리를 저장하는 AdjacencyList를 정의했습니다. 이미 그래프 프로토콜을 채택했지만 여전히 요구 사항을 구현해야합니다.
Creating a vertex
public func createVertex(data: T) -> Vertex<T> {
  let vertex = Vertex(index: adjacencies.count, data: data)
  adjacencies[vertex] = []
  return vertex
}
새로운 꼭지점을 만들고 반환합니다.
Creating a directed edge
방향이 지정된 그래프와 방향이 없는 그래프가 있다는걸 기억합니다.
addDirectedEdge 요구에 의한 구현을 시작합니다.
public func addDirectedEdge(from source: Vertex<T>,
                            to destination: Vertex<T>,
                            weight: Double?) {
  let edge = Edge(source: source,
                  destination: destination,
                  weight: weight)
  adjacencies[source]?.append(edge)
}
위의 매소드는 새로운 모서리를 생성하고 그것을 adjacency list에 저장합니다.
Creating an undirected edge
두개의 꼭지점 사이의 방향성이 있는 모서리를 추가하는 매소드를 생성했습니다. 그럼 이제 두개의 꼭지점 사이에 양방향 모서리는 어떻게 생성하나요?
방향이 없는 그래프(undirected graph)는 양방향 그래프(bidirectional graph)처럼 보였다는걸 상기합니다. 방향이 없는 그래프에서 모든 모서리는 양방향 모두 순회 할수 있습니다. 이것은 addUndirectedEdge를 addDirectedEdge 위에 구현해야 이유입니다.
따라서 이 구현은 재사용되고, 따라서 그것을 Graph 프로토콜 확장으로 추가합니다.
extension Graph {
  public func addUndirectedEdge(between source: Vertex<Element>,
                                and destination: Vertex<Element>,
                                weight: Double?) {
    addDirectedEdge(from: source, to: destination, weight: weight)
    addDirectedEdge(from: destination, to: source, weight: weight)
  }
}
이제 너는 addDirectionalEdge와 addUndirectedEdge를 구현했습니다. 위임에 의해서 add를 구현할수 있습니다. 동일한 프로토콜 확장에서 다음을 추가합니다.
public func add(_ edge: EdgeType, from source: Vertex<Element>,
                                  to destination: Vertex<Element>,
switch edge {
case .directed:
weight: Double?) {
    addDirectedEdge(from: source, to: destination, weight: weight)
  case .undirected:
    addUndirectedEdge(between: source, and: destination, weight: weight)
  }
}
add 메서드는 방향 또는 방향이 지정되지 않은 모서리를 만드는 편리한 도우미 메서드입니다.
이것은 프로토콜이 매우 강력해질 수있는 곳입니다! 그래프 프로토콜을 채택한 사람은 addUndirectedEdge를 얻고 무료로 추가하기 위해서 addDirectedEdge 만 구현하면됩니다!
Retrieving the outgoing edges from a vertex
AdjacencyList.swift로 돌아가서, 아래의 메소드를 추가합니다
public func edges(from source: Vertex<T>) -> [Edge<T>] {
  return adjacencies[source] ?? []
}
이것은 확실한 구현입니다. 저장된 모서리들을 반환하거나 Source 꼭지점이 알수없다면, 비어있는 배열을 반환합니다.
Retrieving the weight of an edge
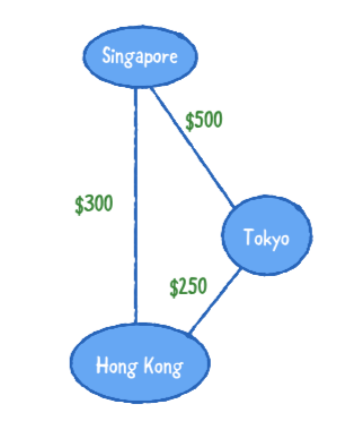
싱가폴에서 도쿄로 가는 항공편을 얼마인가요?
edges(from:) 다음에 아래의 메소드를 추가합니다
public func weight(from source: Vertex<T>,
                   to destination: Vertex<T>) -> Double? {
  return edges(from: source)
           .first { $0.destination == destination }?
           .weight
}
source에서 destination으로 연결된 모서리의 첫번째에서 가중치를 찾을수 있습니다. 만약 한개라면 해당 모서리의가중치를 반환합니다
Visualizing the adjacency list
extension AdjacencyList: CustomStringConvertible {
  public var description: String {
    var result = ""
    for (vertex, edges) in adjacencies { // 1
      var edgeString = ""
      for (index, edge) in edges.enumerated() { // 2
        if index != edges.count - 1 {
          edgeString.append("\(edge.destination), ")
} else {
          edgeString.append("\(edge.destination)")
        }
}
      result.append("\(vertex) ---> [ \(edgeString) ]\n") // 3
    }
    return result
  }
}
- 인접리스트에서 키와 벨류 값을 반복합니다
- 모든 꼭지점에 대해 모든 모서리를 반복하고 적절한 문자열을 출력에 추가합니다.
- 마지막으로 모든 꼭지점에 대해 그 자신의 곡지점과 그것들과 연결된 모서리들을 출력합니다.
Building a network
let graph = AdjacencyList<String>()
let singapore = graph.createVertex(data: "Singapore")
let tokyo = graph.createVertex(data: "Tokyo")
let hongKong = graph.createVertex(data: "Hong Kong")
let detroit = graph.createVertex(data: "Detroit")
let sanFrancisco = graph.createVertex(data: "San Francisco")
let washingtonDC = graph.createVertex(data: "Washington DC")
let austinTexas = graph.createVertex(data: "Austin Texas")
let seattle = graph.createVertex(data: "Seattle")
graph.add(.undirected, from: singapore, to: hongKong, weight: 300)
graph.add(.undirected, from: singapore, to: tokyo, weight: 500)
graph.add(.undirected, from: hongKong, to: tokyo, weight: 250)
graph.add(.undirected, from: tokyo, to: detroit, weight: 450)
graph.add(.undirected, from: tokyo, to: washingtonDC, weight: 300)
graph.add(.undirected, from: hongKong, to: sanFrancisco, weight: 600)
graph.add(.undirected, from: detroit, to: austinTexas, weight: 50)
graph.add(.undirected, from: austinTexas, to: washingtonDC, weight: 292)
graph.add(.undirected, from: sanFrancisco, to: washingtonDC, weight: 337)
graph.add(.undirected, from: washingtonDC, to: seattle, weight: 277)
graph.add(.undirected, from: sanFrancisco, to: seattle, weight: 218)
graph.add(.undirected, from: austinTexas, to: sanFrancisco, weight: 297)
print(graph.description)
Adjacency matrix
인접 행렬(An adjacency matrix)는 사각형 행렬(sequare matrix)을 사용하여 그래프를 표시합니다. 이 행렬은 이차원 배열은 행의 꼭지점과 열의 꼭지점 사이의 모서리의 가중치가 matrix[row][colume]의 값을 갖는 2차원 배열 입니다.
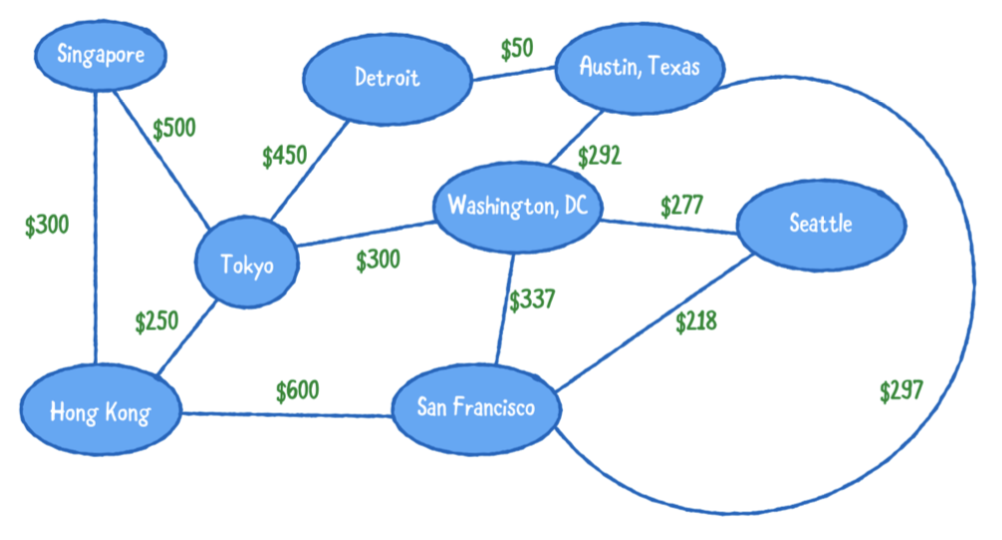
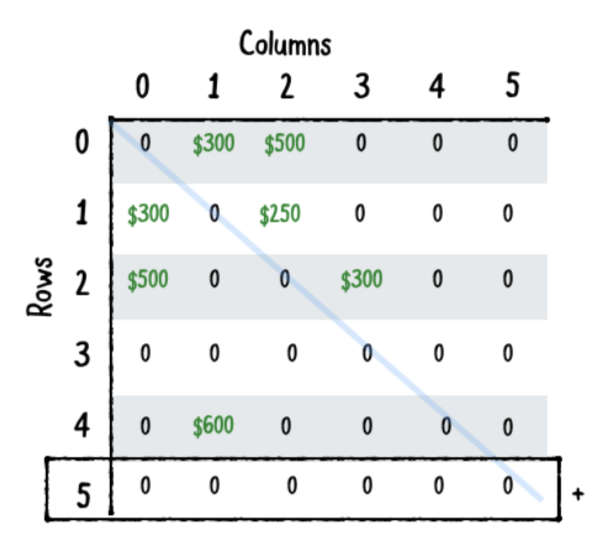
아래는 다른 장소로 여행하는 비행 네트워크를 묘사하는 방향이있는 그래프의 예입니다. 무게는 항공료 비용을 나타냅니다.
다음 인접 행렬은 위에 묘사 된 비행을위한 네트워크를 설명합니다. 존재하지 않는 모서리의 가중치는 0입니다.
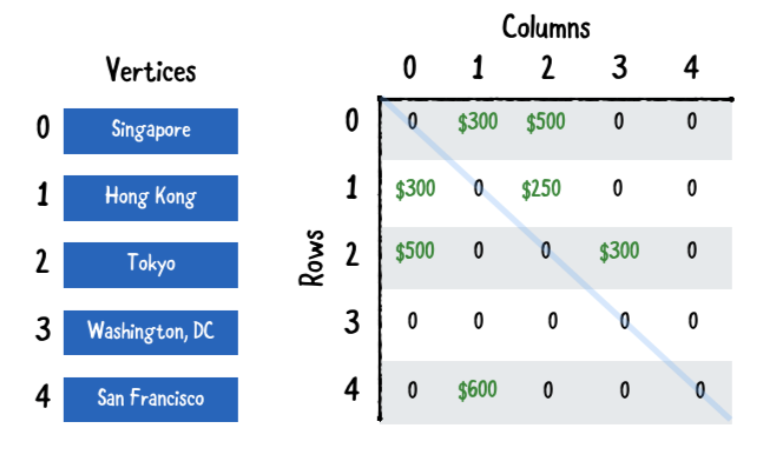
인접 목록과 비교되고, 이 행렬은 읽기가 조금더 어렵습니다. 왼쪽의 꼭지점 배열을 사용하고, 이 메트릭스의 예제를 통해서 많은것을 배울수 있습니다
- [0][1]은 300이고, 싱가폴에서 홍콩으로 가는 항공편은 $300 입니다.
- [2][1]은 0이고, 도쿄에서 홍콩으로 가는 항공편은 없습니다
- [1][2]는 250이고, 홍콩에서 도쿄로 가는 항공편은 $250 입니다.
- [2][2]는 0이고 도쿄에서 도쿄로 가는 항공편은 없습니다.
Note: 매트릭스 중간에 파란줄이 있습니다. 행과 열이 같을때 그것은 꼭지점과 꼭지점 사진 사이의 모서리 입니다. 그것은 허용되지 않습니다!
Implementation
새로운 파일을 생성합니다 AdjacencyMatrix.swift
public class AdjacencyMatrix<T>: Graph {
  private var vertices: [Vertex<T>] = []
  private var weights: [[Double?]] = []
  public init() {}
  // more to come ...
}
여기에서는 꼭지점 배열과 인접행렬을 포함하는 AdjacencyMatrix를 정의하여 모서리와 가중치를 추적합니다.
이전과 마찬가지로 이미 그래프에 대한 적합성을 선언했지만 요구사항을 구현해야합니다.
Creating a Vertex
public func createVertex(data: T) -> Vertex<T> {
  let vertex = Vertex(index: vertices.count, data: data)
  vertices.append(vertex) // 1
  for i in 0..<weights.count { // 2
    weights[i].append(nil)
  }
  let row = [Double?](repeating: nil, count: vertices.count) // 3
  weights.append(row)
  return vertex
}
인접 매트릭스에 꼭지점을 추가합니다
- 새로운 꼭지점을 배열에 추가합니다
- 현재 꼭지점 중 어느 것도 새로운 꼭지점에 대해 모서리를 가지지 않으므로 행렬의 모든 행에 아무 가중치도 추가하지 않습니다.
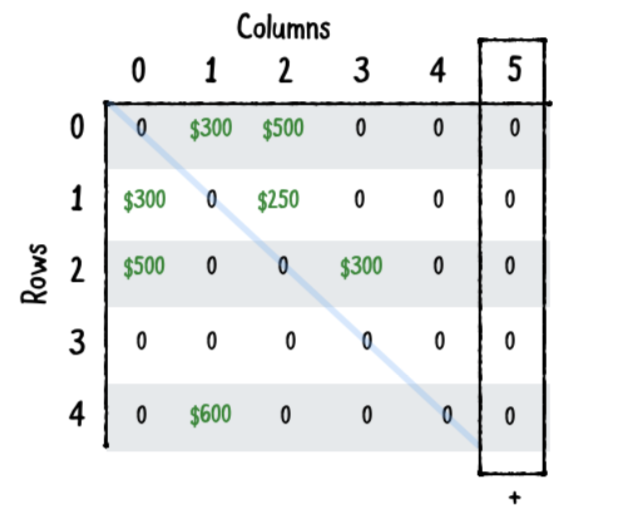
- 행렬에 새 행을 추가하십시오. 이 행은 새 꼭지점에 대한 모서리를 유지합니다.
Creating edges
모서리를 생성하는 것은 행렬을 채우는것만큼 간단합니다.
public func addDirectedEdge(from source: Vertex<T>,
                            to destination: Vertex<T>, weight: Double?) {
  weights[source.index][destination.index] = weight
}
addUndirectedEdge와 add가 프로토콜 확장에 기본 구현을 가지고 있음을 기억하십시오. 이렇게하면됩니다.
Retrieving the outgoing edges from a vertex
public func edges(from source: Vertex<T>) -> [Edge<T>] {
        var edges: [Edge<T>] = []
        for column in 0..<weights.count {
            if let weight = weights[source.index][column] {
                edges.append(Edge(source: source, destination: vertices[column], weight: weight))
            }
        }
        return edges
    }
꼭지점에 대한 모서리를 검색하려면 행렬에서 이 꼭지점에 대해 nil이 아닌 가중치를 검색합니다. 모든 nil이 아닌 가중치는 나가는 가장자리와 일치합니다. 대상은 가중치를 가진 열과 일치하는 정점입니다.
Retrieving the weight of an edge
모서리의 무게를 얻는 것은 매우 쉽습니다. 인접성 행렬에서 값을 찾아보기 만하면됩니다. 이 방법을 추가하십시오.
public func weight(from source: Vertex<T>,
                   to destination: Vertex<T>) -> Double? {
  return weights[source.index][destination.index]
}
Visualize an adjacency matrix
extension AdjacencyMatrix: CustomStringConvertible {
    public var description: String {
        // 1
        let verticesDescription = vertices.map { "\($0)" }
        // 2
        var grid: [String] = []
        for i in 0..<weights.count {
            var row = ""
            for j in 0..<weights.count {
                if let value = weights[i][j] {
                    row += "\(value)\t"
                } else {
                    row += "ø\t\t"
                }
            }
            grid.append(row)
        }
        let edgesDescription = grid.joined(separator: "\n")
        // 3
        return "\(verticesDescription)\n\n\(edgesDescription)"
    }
}
- 꼭지점의 목록을 생성합니다.
- 그리고 무게들의 표를 한 행씩 작성합니다.
- 마지막으로 함께묘사된것과 그들의 반환을 연결합니다
Building a network
우리는 AdjacencyList의 예제를 재사용합니다.
// 1
let graph = AdjacencyList<String>()

위의 코드를 아래의 코드로 변경합니다
// 2
let graph = AdjacencyMatrix<String>()
Graph analysis
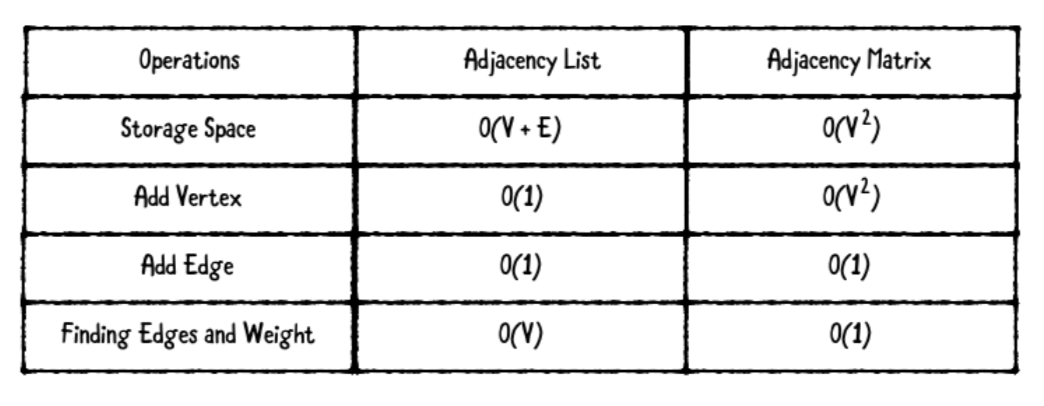
V는 꼭지점을 나타내고 E는 모서리를 나타냅니다
인접목록은 인접행렬보다 적은 저장공간을 가집니다. 인접목록은 간단하게 필요한 꼭지점과 모서리의 수를 저장합니다. 인접행렬은 행과 열의 수가 꼭지점의 수와 같다는것을 기억하세요(저장공간 V*2)
꼭지점을 추가하는것은 인접목록에서 효율적입니다. 단순하게 꼭지점을 생성하고 사전의 키, 값으로 설정하면 됩니다. 그것은 O(1)로 처리됩니다. 인접행렬에서 꼭지점을 추가할때 모든 행에 열을 추가하고 새 꼭지점에 대한 새 행을 만들어야 합니다. 이것은 적어도 O(V)이고, 연속적인 메모리 블록으로 메트릭스를 표현하기로 선택하면 O(V*2)가 될수 있습니다.
모서리를 추가하는 것은 두 자료구조에서 변함없는 시간을 가지기 떄문에 효율적입니다. 인접목록은 모서리 배열에 추가합니다. 인접 행렬은 간단하게 이차원 배열에 값을 조정합니다.
인접목록은 특정 모서리와 무게를 찾으려고할때 손해를 봅니다. 인접목록에서 모서리를 찾는것은 모든 모서리 목록을 가져와 일치하는 대상을 찾기 위해 모든 모서리를 반복해야합니다. 이것은 O(V)의 시간이 발생합니다. 인접 행렬을 사용하면 모서리와 가중치를 찾는것은 2차원 배열에서 값을 검색하기 위한 일정한 시간 접근과 동일합니다.
어떤 자료구조를 선택해야 하나요?
그래프에 모서리가 거의 없는 경우에 그것은 빈약한 그래프(sparse graph)로 고려되어 지고 인접 목록이 좋을것입니다. 인접행렬은 빈약한 그래프에는 좋지 않습니다. 왜냐하면 많은 메모리는 많은 모서리때문에 낭비되기 때문입니다.
그래프의 모서리가 많으면 촘촘한 그래프(dense graph)로 간주되고 인접 행렬은 가중치와 모서리에 허ㅜㄹ씬 빨리 접근할 수 있기 때문에 접합합니다.
더 알아보면 좋은것
Breadth-First Search(너비 우선 탐색)
Depth-First Search(깊이 우선 탐색)
원리는 트리의 방법과 동일함
Reference
Data Structures and Algorithms in Swift
swift-algorithm-club/Graph