Table of contents
- Custom UICollectionViewLayout Tutorial With Parallax
- Getting Started
- Layout Settings
- Layout Attributes
- The Role of UICollectionViewLayout
- Step 1: Subclassing the UICollectionViewLayout Class
- Step 2: Implementing the CollectionViewLayout Core Process
- Step 3: Adoptng the CustomLayout
- Adding Stretchy, Sticky and Parallax Effects
- Affine Transforms
- Transforming Visible Attributes
- Where to Go From Here?
Custom UICollectionViewLayout Tutorial With Parallax 에서 필요한 부분을 의역 했습니다.
Custom UICollectionViewLayout Tutorial With Parallax
Note: 이 튜토리얼은 Xcode 9.0, Swift 4를 사용합니다.
UICollectionView는 iOS 6에서 소개 되었고 iOS 10에서 새로운 기능으로 개선되었습니다. UICollectionView는 iOS application에서 data collection을 제출하여 애니메이션과 사용자화 하기 위한 first-class choice(이걸 뭐라고 해야하나..) 입니다.
UICollectionView와 관련된 주요한 본질(entity)은UICollectionViewLayout 입니다. UIcollectionViewLayout 객체는 cell, supplementary views, decoration views와 같은 collection view의 모든 요소들의 속성(attributes)의 정의에 대해서 대표합니다.
UIKit은 UICollectionViewFlowLayout이라고 불리는 UICollectionViewLayout의 기본 구현을 제공합니다. 이 클레스는 어떤 사용자화된 요소를 grid layout으로 설정할수 있게 해줍니다.
UICollectionViewLayout튜토리얼은 UICollectionViewLayout을 어떻게 하위 클레싱 하고 사용자화 하는지에 대해서 가르치고. 또한 사용자화된 supplementary views, stretchy, sticky, parallax 효과를 collectionView에 어떻게 추가하는지 보여줍니다.
Note: 이
UICollectionViewLayout튜토리얼은 Swift 4.0의 중간정도 실력의 지식과UICollectionView의 상급 지식을 요구하고 affine transforms 와 UICollectionViewLayout에서 어떻게 core layout process가 동작하는지 명확한 이해를 요구합니다.
위의 토픽이 친숙하지 않다면 여기를 참조할수 있습니다.

또한 다음의 좋은 튜토리얼들을 확인할수도 있습니다.
- UICollectionView Tutorial: Getting Started
- UICollectionView Tutorial: Reusable Views, Selection and Reordering
- UICollectionView Custom Layout Tutorial: Pinterest
- Video Tutorial: Collection Views Part 0: Introduction
UICollectionViewLayout튜토리얼의 마지막에 도달하면 다음과같은 UIcollectionView를 구현할수 있습니다.
Getting Started
여기에서 시작 프로젝트를 다운로드 하고, 프로젝트를 빌드하고 실행합니다.
다음에 색션 header, footer들이 있는 표준 UICollectionView에 귀여운 올빼미가 배치되어 있는것을 볼수 있을것 입니다.
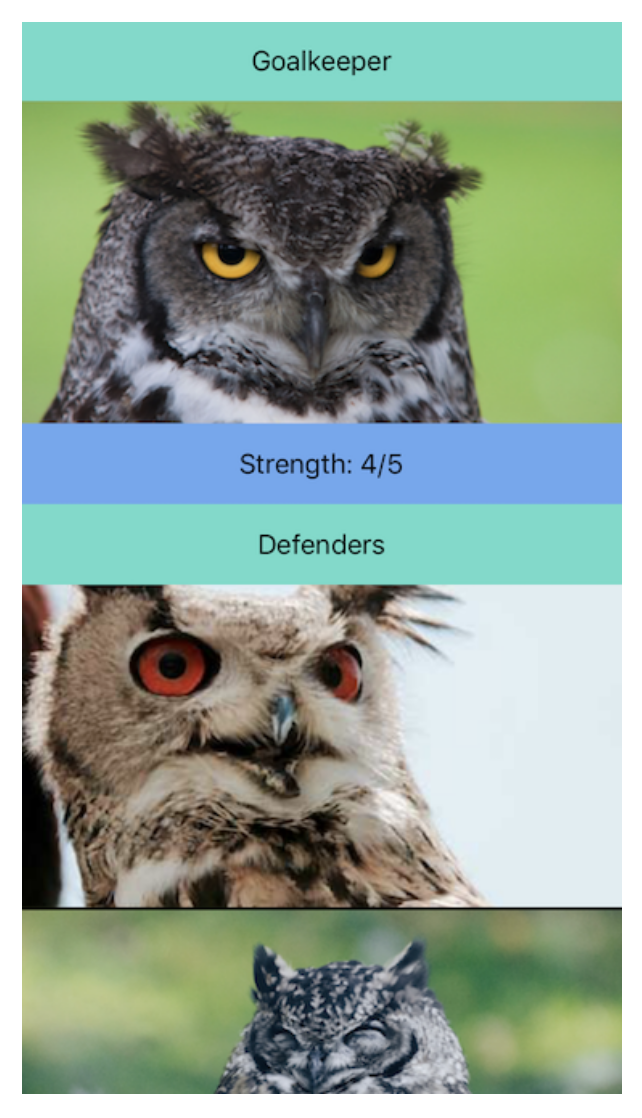
이 앱은 Jungle Soccer Cup 2017에 참가하는 올빼미 팀읜 플레이어들을 보여주는 앱입니다. Section header는 팀에서 이들의 역할을 보여주고 footers은 집단의 전략(collective strength)을 보여줍니다.
프로젝트를 자세히 살펴 봅니다.
JungleCupCollectionViewController.swift 내부 파일에서 UIcollectionViewDataSource를 체택하고 UICollectionViewControlelr를 하위클레싱한 구현을 찾을수 있을 것입니다. 이 UICollectionViewController는 supplementary views를 추가하는것에 대한 선택적인 옵션 메소드와 함께 요구된 모든 메소드를 구현합니다.
JungleCupCollectionViewController는 MenuViewDelegate 또한 체택합니다. 이것은 collectionv view의 자체 데이터 소스를 전환하는 프로토콜 입니다.
Reuseable Views 폴더에서 cell에 대한 UICollectionViewCell의 하위클레싱이 있고, section header와 section footer에 대한 UICollectionViewReusable도 있습니다. 이들은 Main.storyboard파일에서 각각의 설계된 뷰에 연결됩니다.
그 외에도, CustomLayout에서 요구하는 사용자화된 supplementary view가 있습니다. HeaderView 와 MenuView 클레스는 UICollectionViewReusableView의 하위 클레싱 입니다. 이 둘은 .xib파일에 연결되어 집니다.
MockDataManager.swift 파일은 모든 팀에 대한 데이터 구조를 가지고 있습니다. 편의상 Xcode 프로젝트는 필요한 모든 assets를 추가합니다.
Layout Settings
Custom Layout 폴더는 주목할만 합니다. 왜냐하면 두개의 중요한 파일을 포함하기 때문입니다.
- CustomLayoutSetting.swfit
- customLayoutAttributes.swift
CustomLayoutSettings.swift은 모든 레이아웃 설정을 가진 구조체를 구현합니다. 설정의 첫번째 그룹은 collection view 요소들의 사이즈를 다루고 두번째 그룹은 layout의 행동을 정의하고 세번째는 layout 간격을 설정합니다.
Layout Attributes
CustomLayoutAttributes.swift 파일은 CustomLayoutAttributes 라고 명명된 UICollectionViewLayoutAttributes의 하위 클레싱을 구현 합니다. 이 클레스는 화면에 layout attributes 속성을 보여주기 전에 요소(element)를 구성하기 위해 필요한 collection view의 모든 정보를 저장합니다.
이것은 superclass에서 zIndex, alpha, transform3D, transform, frame 같은 기본 attributes를 상속받습니다.
또한 새로운 어떤 사용자화된 속성을 추가합니다.
var parallax: CGAffineTransform = .identity
var initialOrigin: CGPoint = .zero
var headerOverlayAlpha = CGFloat(0)
parallax, initialOrigin, headerOverlayAlpha는 나중에 늘어나는 효과와 끈적거리는 효과를 구현할때 사용할 사용자화된 속성입니다.(parallax, initialOrigin and headerOverlayAlpha are custom properties you’ll use later in the implementation of stretchy and sticky effects.)
Note: Layout attributes 객체는 collection view에 의해서 되어 집니다. 그러므로,
UICollectionViewLayoutAttributes를 하위 클레싱 할때,NSCopying를 새로운 인스턴스로 사용자화된 attributes를 복사하기 위한 적절한 메소드를 구현하여NSCopying프로토콜을 반드시 체택 에 대한 조건을 만족 시켜야합니다.custom layout attributes를 구현한다면, 속성 값을 비교하기 위해 상속받은
isEqual메소드를 반드시 재정의 해야합니다. iOS 7 부터 collection view는isEqualattributes가 변경되지 않으면 layout attributes가 적용되지 않습니다.
현재 collection view는 모든 팀을 아직 화면에 표시할수 없습니다. Tiger, Parrots, Giraffes 팀은 아직 화면에 표시할수 없기 때문에 기다려야 합니다.
걱정하지마세요. 이들은 곳 돌아올 것입니다! CustomLayout은 이 문제를 해결 할것입니다.
The Role of UICollectionViewLayout
UICollectionViewLayout 객체의 주된 목적은 UICollectionView에 모든 요소의 가기성 상태와 위치에 대한 정보를 제공하는 것입니다. UICollectionViewLayout 객체는 cell, supplementary view를 생성하는 것에 대한 책임이 없다는것을 명심 해야합니다. UIcollectionViewLayout이 할일은 올바른 attributes와 함께 이들을 제공하는 것입니다.
UIcollectionViewLayout을 생성하는 것은 세단계 과정 입니다.
- 추상 클레스인
UICollectionViewLayout를 하위 클레싱하고 layout 연산을 이행하기 위해 필요한 모든 속성을 선언합니다. - 올바른 attributes와 함께 모든 collection view의 요소(element)를 제공하기 위해 필요한 모든 연산을 이행합니다. 이 부분은 대개 복잡합니다. 왜냐하면
CollectionViewLayout의 핵심 처리 이기 때문입니다. - collection view에
CustomLayout를 체택합니다
Step 1: Subclassing the UICollectionViewLayout Class
Custom Layout 그룹 내부에 CustomLayout 클레스 스텁을 포함하는 CustomLayout.swift라고 명명된 Swift 파일을 찾을수 있을 것입니다. UICollectionViewLayout을 하위클레싱하여 구현한 이 클레스 내에서 모든 핵심 layout 처리를 구현할것입니다.
먼저 attributes를 연산하기 위해 필요한 모든 CustomLayout 속성을 선언합니다.
import UIKit

final class CustomLayout: UICollectionViewLayout {

  // 1
  enum Element: String {
    case header
    case menu
    case sectionHeader
    case sectionFooter
    case cell

    var id: String {
      return self.rawValue
    }

    var kind: String {
      return "Kind\(self.rawValue.capitalized)"
    }
  }

  // 2
  override public class var layoutAttributesClass: AnyClass {
    return CustomLayoutAttributes.self
  }

  // 3
  override public var collectionViewContentSize: CGSize {
    return CGSize(width: collectionViewWidth, height: contentHeight)
  }

  // 4
  var settings = CustomLayoutSettings()
  private var oldBounds = CGRect.zero
  private var contentHeight = CGFloat()
  private var cache = [Element: [IndexPath: CustomLayoutAttributes]]()
  private var visibleLayoutAttributes = [CustomLayoutAttributes]()
  private var zIndex = 0

  // 5
  private var collectionViewHeight: CGFloat {
    return collectionView!.frame.height
  }

  private var collectionViewWidth: CGFloat {
    return collectionView!.frame.width
  }

  private var cellHeight: CGFloat {
    guard let itemSize = settings.itemSize else {
      return collectionViewHeight
    }

    return itemSize.height
  }

  private var cellWidth: CGFloat {
    guard let itemSize = settings.itemSize else {
      return collectionViewWidth
    }

    return itemSize.width
  }

  private var headerSize: CGSize {
    guard let headerSize = settings.headerSize else {
      return .zero
    }

    return headerSize
  }

  private var menuSize: CGSize {
    guard let menuSize = settings.menuSize else {
      return .zero
    }

    return menuSize
  }

  private var sectionsHeaderSize: CGSize {
    guard let sectionsHeaderSize = settings.sectionsHeaderSize else {
      return .zero
    }

    return sectionsHeaderSize
  }

  private var sectionsFooterSize: CGSize {
    guard let sectionsFooterSize = settings.sectionsFooterSize else {
      return .zero
    }

    return sectionsFooterSize
  }

  private var contentOffset: CGPoint {
    return collectionView!.contentOffset
  }
}
이것은 꾀 많은 코드지만 이것을 분해하면 상당히 간단합니다(그럴리 없다..)
enum은CustomLayout의 모든 요소를 정의하는것에 대한 좋은 선택합니다. 이것은strings들을 사용하는것을 방지합니다. 황금룰 기억하나요?스트링이 없으면 = 오타도 없다- 연산된
layoutAttributesClass프로퍼티는 attributes instance를 사용하기위한 클레스를 제공합니다. 반드시CustomLayoutAttributes클레스 타입을 반환해야 합니다: 이 사용자화된 클레스는 시작 프로젝트에서 찾을수 있습니다. UIcollectionViewLayout의 하위클레스는 반드시collectionViewContentSize연산 프로퍼티를 재정의 해야합니다.CustomLayout은 attributes를 준비하기위한 단계에서 위의 모든 속성들이 필요합니다. 이들은 모두settings를 제외하고는 모두fileprivate이기 떄문에settings는 외부객체에 의해서 설정 될수 없습니다.- 문법 편리를 위한 연산 프로퍼티의 사용은 나중에 장황한 반복을 피하기 위함입니다.(Computed properties used as syntactic sugar to avoid verbose repetitions later.)
이제 선언과 함께 완료됬고 Core Layout process 구현에 집중할수 있습니다.
Step 2: Implementing the CollectionViewLayout Core Process
Note: 만약 Core Layout process가 익숙하지 않다면 잠깐 시간을 내어 this tutorial을 읽어볼것을 권합니다. 다음의 코드는 Core Layout workflow를 명확하게 이해해야 합니다.
collection view는 전체 레이아웃 처리를 관리하기 위해 CustomLayout과 함께 직접적으로 일합니다. 예를 들어 collection view는 collection view layout 정보가 첫번째로 화면에 보여지거나 사이즈가 조절될때(resized) 레이아웃 정보에 대한것을 요청합니다.
layout 처리 동안, collection view는 CustomLayout 객체와함께 전체 layout process를 관리하기 위해 함께 동작합니다. 선택적인 메소드들은 애니메이션 업데이트 같은 지정된 주위 환경에 따라서 호출되어 질것입니다. 이 메소드들은 아이템의 위치를 연산하기 위한 기회이고 collection view를 필요한 정보와 함께 제공합니다.
처음 재정의 해야하는 두개의 메소드는
prepare()shouldInvalidateLayout(forBoundsChange:)
prepare()는 레이아웃에서 요소들의 위치를 결정하기 위해 필요한 모든 연산을 이행할수 있는 곳입니다. shouldInvalidateLayout(forBoundsChnage:)는 CustomLayout 객체가 core process를 다시 수행 해야할때, 어떻게 정의해야할지 정의 하는 곳입니다.
prepare()구현을 시작해봅니다.
CustomLayout.swift를 열고 파일의 끝에 다음 확장을 추가합니다.
// MARK: - LAYOUT CORE PROCESS
extension CustomLayout {

  override public func prepare() {

    // 1
    guard let collectionView = collectionView,
      cache.isEmpty else {
      return
    }
    // 2
    prepareCache()
    contentHeight = 0
    zIndex = 0
    oldBounds = collectionView.bounds
    let itemSize = CGSize(width: cellWidth, height: cellHeight)

    // 3
    let headerAttributes = CustomLayoutAttributes(
      forSupplementaryViewOfKind: Element.header.kind,
      with: IndexPath(item: 0, section: 0)
    )
    prepareElement(size: headerSize, type: .header, attributes: headerAttributes)

    // 4
    let menuAttributes = CustomLayoutAttributes(
      forSupplementaryViewOfKind: Element.menu.kind,
      with: IndexPath(item: 0, section: 0))
    prepareElement(size: menuSize, type: .menu, attributes: menuAttributes)

    // 5
    for section in 0 ..< collectionView.numberOfSections {

      let sectionHeaderAttributes = CustomLayoutAttributes(
        forSupplementaryViewOfKind: UICollectionElementKindSectionHeader,
        with: IndexPath(item: 0, section: section))
      prepareElement(
        size: sectionsHeaderSize,
        type: .sectionHeader,
        attributes: sectionHeaderAttributes)

      for item in 0 ..< collectionView.numberOfItems(inSection: section) {
        let cellIndexPath = IndexPath(item: item, section: section)
        let attributes = CustomLayoutAttributes(forCellWith: cellIndexPath)
        let lineInterSpace = settings.minimumLineSpacing
        attributes.frame = CGRect(
          x: 0 + settings.minimumInteritemSpacing,
          y: contentHeight + lineInterSpace,
          width: itemSize.width,
          height: itemSize.height
        )
        attributes.zIndex = zIndex
        contentHeight = attributes.frame.maxY
        cache[.cell]?[cellIndexPath] = attributes
        zIndex += 1
      }

      let sectionFooterAttributes = CustomLayoutAttributes(
        forSupplementaryViewOfKind: UICollectionElementKindSectionFooter,
        with: IndexPath(item: 1, section: section))
      prepareElement(
        size: sectionsFooterSize,
        type: .sectionFooter,
        attributes: sectionFooterAttributes)
    }

    // 6
    updateZIndexes()
  }
}
각 코멘츠에 대해서 설명합니다.
Prepare연산은 리소스 집약적인(resources-intensive) 이고 이것은 성능에 영향을 줄수 있습니다. 이러한 이유로 연산된 attributes를 생성시에 캐시할수 있습니다. 실행하기 전에 cache 사전이 비어 있거나 없는지 확인 해야합니다. 이것은 오래된 attirbutes 인스턴스와 새로운 인스턴스를 망치지 않기 때문에 중요 합니다.cache사전이 비어 있으면, 이 프로퍼티를 초기화 해야 합니다.prepareCache()를 호출하여 이것을 실행합니다. 이 메소드는 이 설명 이후에 구현되어 집니다.- 신축성있는 header는 collection view의 첫번째 요소입니다. 이것에 대한 이유로, 이것의 attributes를 먼저 고려합니다.
CustomLayoutAttributes클레스 인스턴스를 생성하고 그후prepareElement(size:type:attributes)에 전달합니다. 다시 한번 이야기 하지만 이 메소드를 나중에 구현할것입니다. 이 attributes들을 올바르게 캐시하려면 사용자화된 요소를 만들때마다 이 메소드를 호출 해야합니다. sticky menu는 collection view의 두번째 요소 입니다. 이전에 attributes를 연산할때와 같은 방법으로 연산합니다.- 이 반복문은 core layout process의 가장 중요한 부분 입니다. collection view의 모든
section의 모든item에 대한것 입니다:- section의 header에 대한
attributes를 생성하고 준비합니다 items에 대한attributes를 생성합니다.- 지정된
indexPath를 연관 지읍니다. - items의
frame,zIndex를 설정하고 연산합니다. collectionView의contentHeight를 업데이트 합니다.type(이 경우에는 cell)을 사용하는cache사전에서 방금 생성된 attributes를 저장하고 Keys값으로 요소의 indexPath를 사용합니다.- 마지막으로 section의 footer에 대한 attributes를 준비하고 생성합니다.
- section의 header에 대한
- 마지막으로(적지 않지만), 모든
zIndex값을 업데이트하기 위해 메소드를 호출합니다.updateZIndexes()에 대한 자세한점은 나중에 찾을 것이고 왜 이것이 중요한지 알게 될것입니다.
다음으로, prepare()아래에 다음 메소드를 추가합니다.
override public func shouldInvalidateLayout(forBoundsChange newBounds: CGRect) -> Bool {
  if oldBounds.size != newBounds.size {
    cache.removeAll(keepingCapacity: true)
  }
  return true
}
shouldInvalidateLayout(forBoundsChange:)내에서, prepare() 에 의해서 실행된 연산을 언제 어떻게 무효화 할것인지 정의 해야합니다. collection view는 해당 bounds 속성이 변경될때마다 이 메소드를 호출합니다. collection view의 bounds속성은 유저가 스크롤할때마다 매번 변경되는것을 알고 주의합니다.
bounds size가 변할때 항상 true를 반환하고, 이것은 collectionview가 portrait에서 landscape 모드 전환될때 또는 그 반대일 경우에 트렌지션 되어집니다. 이때도 마찬가지로 cache사전을 제거 합니다.
cache 제거는 필요합니다 왜냐하면 디바이스의 방향 변경이 시작되면 collection view의 프레임을 다시 그려야 합니다. 결과적으로 모든 저장된 attributes는 새로운 collection view의 프레임에 맞지 않습니다.
다음으로 prepare() 내부에서 호출되어진 모든 메소드들을 구현할것이지만 아직은 구현되지 않았습니다.
확장의 아래에 다음을 추가합니다.
private func prepareCache() {
  cache.removeAll(keepingCapacity: true)
  cache[.header] = [IndexPath: CustomLayoutAttributes]()
  cache[.menu] = [IndexPath: CustomLayoutAttributes]()
  cache[.sectionHeader] = [IndexPath: CustomLayoutAttributes]()
  cache[.sectionFooter] = [IndexPath: CustomLayoutAttributes]()
  cache[.cell] = [IndexPath: CustomLayoutAttributes]()
}
이것은 cache 사전을 비우는 가장 먼저 하는 첫번째 메소드입니다. 다음으로 element type을 primary key로서 사용하여 각 요소 묶음에 대해서 모든 중첩된 사전을 재 설정합니다. indexPath는 캐시된 attributes를 식별하기 위해 사용되는 보조 키 입니다.
다음으로 prepareElement(size:type:attributes:)를 구현합니다.
private func prepareElement(size: CGSize, type: Element, attributes: CustomLayoutAttributes) {
  //1
  guard size != .zero else {
    return
  }
  //2
  attributes.initialOrigin = CGPoint(x:0, y: contentHeight)
  attributes.frame = CGRect(origin: attributes.initialOrigin, size: size)
  // 3
  attributes.zIndex = zIndex
  zIndex += 1
  // 4
  contentHeight = attributes.frame.maxY
  // 5
  cache[type]?[attributes.indexPath] = attributes
}
위에서 무슨일이 일어나는지 단계별로 설명합니다.
- element가
size가 유효한지 아닌지 확인합니다. element가 사이즈가 없다면, 그 자체의attirbutes를 캐시할 이유가 없습니다. - 다음으로 frame의
origin값을 attributes의initialOrigin속성으로 할당합니다. 요소의 초기 위치를 백업 하는것은 parallax와 stciky transforms에 대한 연산을 하기 위해 나중에 필요합니다. - 다음으로 다른 요소들 사이에 겹치는것을 방지하기 위해
zIndex를 할당합니다 - 필요한 정보를 만들고 저장한후, collection view에 새로운 요소를 추가한후
UICollectionView의contentHeight를 업데이트합니다. attributes의 프레임의maxY값을contentHeight프로퍼티로 할당하여 똑똑하게 이 업데이트를 이행합니다. - 마지막으로 element
type와indexPath를 유니크한 keys로서 사용하여cache사전에 attributes를 추가합니다.
마지막으로 prepare()의 마지막에 호출되어진 updateZIndexes()을 구현할 시간입니다.
확장의 아래에 다음코드를 추가합니다.
private func updateZIndexes(){
  guard let sectionHeaders = cache[.sectionHeader] else {
    return
  }
  var sectionHeadersZIndex = zIndex
  for (_, attributes) in sectionHeaders {
    attributes.zIndex = sectionHeadersZIndex
    sectionHeadersZIndex += 1
  }
  cache[.menu]?.first?.value.zIndex = sectionHeadersZIndex
}
이 메소드는 점진적으로 증가시키는 zIndex값을 section header에 할당합니다.(This methods assigns a progressive zIndex value to the section headers.) 이 수는 셀로 할당된 마지막 zIndex값에서 시작합니다. 가장큰 zIndex값은 menu의 attributes에 할당되어 집니다. 이 재 할당은 일관된 sticky 행동을 하기 위해 필요합니다. 이 메소드가 호출되지 않으면 section에 주어진 cell들은 header의 section 보다 더 큰 zIndex값을 가집니다. 이것은 스크롤링하는동안 못생긴 중첩을 발생시킬수 있습니다.
CustomLayout 클레스를 완성시키고 layout core process 작업을 올바르게 작동 시키려면 다음 요구되는 메소드들을 구현 해야합니다.
layoutAttributesForSupplementaryView(ofKind:at:)layoutAttributesForItem(at:)layoutAttributesForElements(in:)
이 메소드들의 목표는 적시에 알맞은 요소와 알맞은 attributes를 제공하는것입니다. 더 명확하게 처음 두개의 메소드는 특정 supplementary view 또는 cell에 대한 attributes를 collection view로 제공합니다. 세번째 메소드는 지정된때에 화면에 표시되는 요소를 위한 layout attributes를 반환합니다.
//MARK: - PROVIDING ATTRIBUTES TO THE COLLECTIONVIEW
extension CustomLayout {

  //1
  public override func layoutAttributesForSupplementaryView(
    ofKind elementKind: String,
    at indexPath: IndexPath) -> UICollectionViewLayoutAttributes? {

  switch elementKind {
    case UICollectionElementKindSectionHeader:
      return cache[.sectionHeader]?[indexPath]

    case UICollectionElementKindSectionFooter:
      return cache[.sectionFooter]?[indexPath]

    case Element.header.kind:
      return cache[.header]?[indexPath]

    default:
      return cache[.menu]?[indexPath]
    }
  }

  //2
  override public func layoutAttributesForItem(
    at indexPath: IndexPath) -> UICollectionViewLayoutAttributes? {
      return cache[.cell]?[indexPath]
  }

  //3
  override public func layoutAttributesForElements(
    in rect: CGRect) -> [UICollectionViewLayoutAttributes]? {
      visibleLayoutAttributes.removeAll(keepingCapacity: true)
      for (_, elementInfos) in cache {
        for (_, attributes) in elementInfos where attributes.frame.intersects(rect) {
          visibleLayoutAttributes.append(attributes)
        }
      }
      return visibleLayoutAttributes
  }
}
주석들에 대해서 설명합니다.
layoutAttributesForSupplementaryView(ofKind:at:)내에서kind속성을 전환하여 올바른kind와indexPath를 일치시켜 캐시된 attributes를 반환합니다.layoutAttributesForItem(at:)내에서 cell의 attributes와 정확하게 동일하게 수행합니다.layoutAttributesForElements(in:)내에서visibleLayoutAttributes배열(여기 보이는 attributes를 저장합니다)을 비웁니다. 그 다음, 모든 캐시된 attributes를 반복하고 보이는 요소만 배열에 추가합니다. 요소가 보이는지 아닌지 결정하기 위해, 프레임이 collection view의 프레임과 교차(intersects)하는지 테스트합니다. 마지막으로 visibleAttributes 배열을 반환합니다.
Step 3: Adoptng the CustomLayout
프로젝트를 구축하고 빌드하고 실행하기전에 다음이 필요합니다.
- collection view는
CustomLayout을 체택 해야합니다. JungleCupCollectionViewController를 custom supplementary view를 지원 하게 만들어야 합니다.
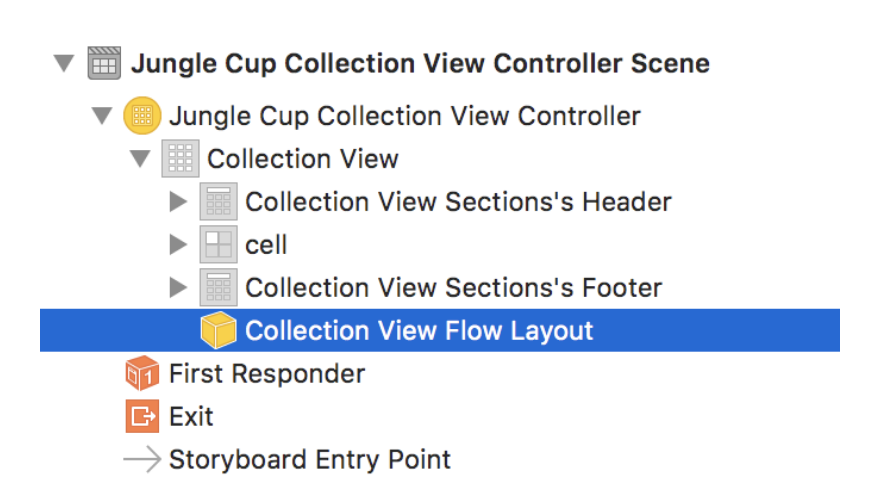
Main.storyboard를 열고 아래에 보여지는것과 같이 Jungle Cup Collection View Controlelr Scene에서 Collection View Flow Layout을 선택합니다.
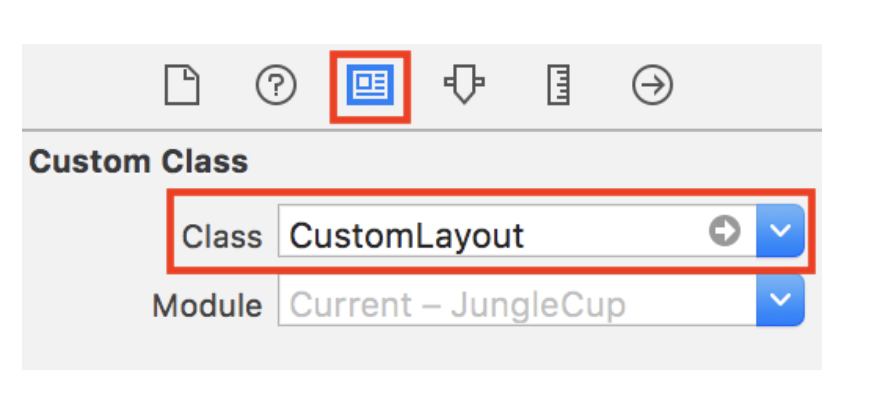
다음으로 Identity Inspector을 열고 Custom Class를 아래에 보이는 것과 같이 CustomLayout으로 변경합니다.
다음으로 JungleCupCollectionViewController.swift를 열고
코드 중복을 피하기위해 연산 프로퍼티 customLayout을 추가합니다.
코드는 다음과같이 보일것 입니다.
var customLayout: CustomLayout? {
  return collectionView?.collectionViewLayout as? CustomLayout
}
다음으로 setUpCollectionViewLayout을 다음과같이 교체합니다.
  private func setupCollectionViewLayout() {
    guard let collectionView = collectionView,
      let customLayout = customLayout else {
        return
    }
    // 1
    collectionView.register(
        UINib(nibName: "HeaderView", bundle: nil),
        forSupplementaryViewOfKind: CustomLayout.Element.header.kind,
        withReuseIdentifier: CustomLayout.Element.header.id
    )
    collectionView.register(
        UINib(nibName: "MenuView", bundle: nil),
        forSupplementaryViewOfKind: CustomLayout.Element.menu.kind,
        withReuseIdentifier: CustomLayout.Element.menu.id
    )

    // 2
    customLayout.settings.itemSize = CGSize(width: collectionView.frame.width, height: 200)
    customLayout.settings.headerSize = CGSize(width: collectionView.frame.width, height: 300)
    customLayout.settings.menuSize = CGSize(width: collectionView.frame.width, height: 70)
    customLayout.settings.sectionsHeaderSize = CGSize(width: collectionView.frame.width, height: 50)
    customLayout.settings.sectionsFooterSize = CGSize(width: collectionView.frame.width, height: 50)
    customLayout.settings.isHeaderStretchy = true
    customLayout.settings.isAlphaOnHeaderActive = true
    customLayout.settings.headerOverlayMaxAlphaValue = CGFloat(0)
    customLayout.settings.isMenuSticky = true
    customLayout.settings.isSectionHeadersSticky = true
    customLayout.settings.isParallaxOnCellsEnabled = true
    customLayout.settings.maxParallaxOffset = 60
    customLayout.settings.minimumInteritemSpacing = 0
    customLayout.settings.minimumLineSpacing = 3
}
위의 코드가 무엇을하는지 설명합니다
- 먼저 신축성있는 header와 사용자화된 메뉴를 위해 사용할 custom class를 등록합니다. 시작 프로젝트에
UICollectionViewReusableView하위 클레싱은 이미 구현 되어 있습니다. - 마지막으로
CustomLayout설정의 간격, 행동, 사이즈를 설정합니다.
앱을 빌드하고 실행 하기전에, 다음 두가지 옵션을 사용자화된 supplementary view 타입을 다루기 위해 viewForSupplementaryElementOfKind(_:viewForSupplementaryElementOfKind:at:)을 추가합니다.
case CustomLayout.Element.header.kind:
  let topHeaderView = collectionView.dequeueReusableSupplementaryView(
    ofKind: kind,
    withReuseIdentifier: CustomLayout.Element.header.id,
    for: indexPath)
  return topHeaderView

case CustomLayout.Element.menu.kind:
  let menuView = collectionView.dequeueReusableSupplementaryView(
    ofKind: kind,
    withReuseIdentifier: CustomLayout.Element.menu.id,
    for: indexPath)
  if let menuView = menuView as? MenuView {
    menuView.delegate = self
  }
  return menuView
좋습니다! 긴 여행 이었지만 대부분 끝났습니다.
프로젝트를 빌드하고 실행합니다. 다음과 비슷한 화면을 봐야합니다.
시작 프로젝트에서 UICollectionView는 이제 어떤 추가적인 기능을 가집니다.
- 상단에 Jungle Cup의 logo가 보이는 큰 header가 있습니다.
- 그 아래에 각 팀에 대한 4개의 버튼이 있는 menu가 있습니다. 버튼을 탭하면 collection view는 연관된 팀으로 reload 합니다.
이미 프로젝트를 완료 했지만, 더 좋게 만들수 있습니다. UICollectionView를 치장시키기 위한 더 멋진 비쥬얼 효과를 구현할 시간입니다.
Adding Stretchy, Sticky and Parallax Effects
이 UICollectionViewLayout 튜토리얼의 마지막 색션에서 다음 비쥬얼 효과를 추가할것입니다.
- header가 stretchy, bouncy 하게 만듭니다.
- menu 와 section header에 sticky 효과를 추가합니다
- UI를 더 빛나게 하기 위해 부드러운 parallax 효과를 구현합니다
Note:
CGATransform과 친숙하지 않다면 this tutorial을 참조 해주세요.UICollectionViewLayout의 튜토리얼의 다음 부분은 affine transforms의 기본 지식을 함축되어 있습니다.
Affine Transforms
Core Graphics CGAFfineTransform API는 UICollectionView의 요소로 비쥬얼 효과를 적용하기 위한 최고의 방법 입니다.
Affine transforms은 다양한 이유로 꾀 유용합니다.
- 이들은 translation, scaling, rotation, 세가지 조합, 다양한 몇줄의 코드 같은 복잡한 비쥬얼 효과를 생성하게 해줍니다.
- 이들은
UIKit과AutoLayout과 함께 나무랄곳 없이 연동됩니다. - 이들은 복잡한 시나리오에도 성능을 최적으로 유지하는데 도움이 됩니다.
affine transforms의 수학은 정말 멋집니다. 하지만 CGATransform의 뒤에서 어떻게 행렬이 동작하는지 설명하는것은 이 튜토리얼의 범위를 벗어납니다.
이 주제에 대해서 흥미가 있다면 Apple’s Core Graphic Framework Documentation을 참조할수 있습니다.
Transforming Visible Attributes
CustomLayout.swift를 열고 layoutAttributesForElemets(in:)을 다음과 같이 업데이트 합니다.
override public func layoutAttributesForElements(
  in rect: CGRect) -> [UICollectionViewLayoutAttributes]? {

    guard let collectionView = collectionView else {
      return nil
    }
    visibleLayoutAttributes.removeAll(keepingCapacity: true)
    // 1
    let halfHeight = collectionViewHeight * 0.5
    let halfCellHeight = cellHeight * 0.5
    // 2
    for (type, elementInfos) in cache {
      for (indexPath, attributes) in elementInfos {
        // 3
        attributes.parallax = .identity
        attributes.transform = .identity
        // 4
        updateSupplementaryViews(
          type,
          attributes: attributes,
          collectionView: collectionView,
          indexPath: indexPath)
        if attributes.frame.intersects(rect) {
          // 5
          if type == .cell,
            settings.isParallaxOnCellsEnabled {
              updateCells(attributes, halfHeight: halfHeight, halfCellHeight: halfCellHeight)
          }
          visibleLayoutAttributes.append(attributes)
        }
      }
    }
    return visibleLayoutAttributes
}
여기 무슨일이 일어나는지 단계별로 설명합니다.
- 반복루프 에서 이들 연산을 피하기 위한 유용한 값을 저장합니다.
- 이것은 이 메소드의 이전 버전으로의 루프와 같은 루프입니다. 모든 캐시된 attributes를 반복합니다.
parallaxtransform 기본값과transformattributes 요소를 재설정 합니다.- 지금은, 다른 kind of supplementary view를 업데이트 하기위해 단순하게 메소드를 호출합니다. 이 코드 블럭 이후에 구현할것입니다.
- 현재 attributes가 cell에 속하는지 확인합니다. layout setting 에서 parallax 효과는 활성화되어 지면, 이 속성을 업데이트하기 위해 메소드를 호출합니다. 바로 위와 같이 이 메소드를 이 코드블럭 이후에 구현합니다.
다음으로, 위의 루프에서 호출될 두 메소드를 구현할 시간입니다
updateSupplementaryViews(_:attributes:collectionView:indexPath:)updatescells(_:halfHeight:halfCellHeight:)
다음 코드를 추가합니다
private func updateSupplementaryViews(_ type: Element,
                                      attributes: CustomLayoutAttributes,
                                      collectionView: UICollectionView,
                                      indexPath: IndexPath) {
    // 1
    if type == .sectionHeader,
      settings.isSectionHeadersSticky {
        let upperLimit =
           CGFloat(collectionView.numberOfItems(inSection: indexPath.section))
           * (cellHeight + settings.minimumLineSpacing)
        let menuOffset = settings.isMenuSticky ? menuSize.height : 0
        attributes.transform = CGAffineTransform(
          translationX: 0,
          y: min(upperLimit,
          max(0, contentOffset.y - attributes.initialOrigin.y + menuOffset)))
    }
    // 2
    else if type == .header,
      settings.isHeaderStretchy {
        let updatedHeight = min(
          collectionView.frame.height,
          max(headerSize.height, headerSize.height - contentOffset.y))
        let scaleFactor = updatedHeight / headerSize.height
        let delta = (updatedHeight - headerSize.height) / 2
        let scale = CGAffineTransform(scaleX: scaleFactor, y: scaleFactor)
        let translation = CGAffineTransform(
          translationX: 0,
          y: min(contentOffset.y, headerSize.height) + delta)
        attributes.transform = scale.concatenating(translation)
        if settings.isAlphaOnHeaderActive {
          attributes.headerOverlayAlpha = min(
            settings.headerOverlayMaxAlphaValue,
            contentOffset.y / headerSize.height)
        }
    }
    // 3
    else if type == .menu,
      settings.isMenuSticky {
        attributes.transform = CGAffineTransform(
          translationX: 0,
          y: max(attributes.initialOrigin.y, contentOffset.y) - headerSize.height)
    }
  }
각 코멘트에 대해서 설명합니다.
- 현재 요소가 색션의 header인지 아닌지 확인합니다. layout seeting에서 sticky 행동을 활성화 하면, 변환을 계산합니다. 마지막으로 attributes의 transform 프로퍼티로 연산된 값을 할당합니다.
- 위와 같은 반복 이지만 여기는 요소가 최상단 헤더인지 확인합니다. stretchy 효과가 활성화 되어 있다면, transform 연산을 이행합니다.
- 다시 같은 반복입니다. 여기는 sticky menu에 대한 transform 연산 입니다.
collection view의 cell을 변환할 시간입니다.
private func updateCells(_ attributes: CustomLayoutAttributes,
                         halfHeight: CGFloat,
                         halfCellHeight: CGFloat) {
  // 1
  let cellDistanceFromCenter = attributes.center.y - contentOffset.y - halfHeight

  // 2
  let parallaxOffset = -(settings.maxParallaxOffset * cellDistanceFromCenter)
    / (halfHeight + halfCellHeight)
  // 3
  let boundedParallaxOffset = min(
    max(-settings.maxParallaxOffset, parallaxOffset),
    settings.maxParallaxOffset)
  // 4
  attributes.parallax = CGAffineTransform(translationX: 0, y: boundedParallaxOffset)
}
각 코멘츠에 대한 설명입니다.
- collection view의
center에서 cell의 거리를 연산합니다. - 최대 시차값(layout setting 에서 설정된 값)의 중심에서 cell의 거리에 비례하여 매핑합니다.
- 시각적 결함을 피하기 위해
parallaxOffset을 Bounds 합니다. - 연산된
parallax변수와 함께CAAffineTransform변환을 생성합니다. 마지막으로, 변환을 cell의 attributestransform속성에 추가합니다.
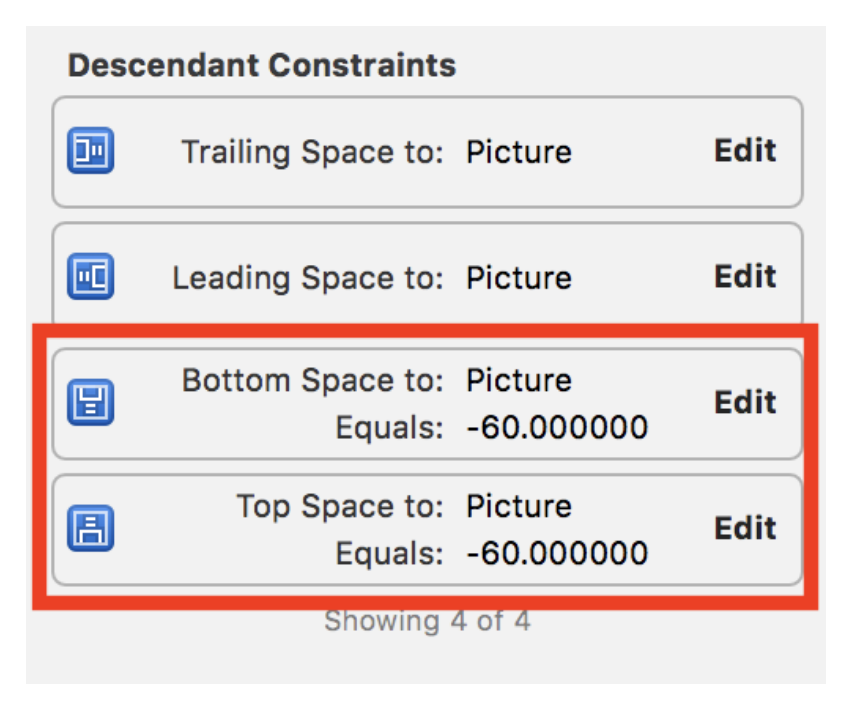
PlayerCell에서 parallax 효과를 달성하기 위해, image의 프레임은 top 과 bottom의 음수 insets값을 가져야 합니다. 시작 프로젝트에서 이러한 제약조건을 설정 해야 합니다. Constraint inspector에서 이들을 확인할수 있습니다.
앱을 빌드하기 전에 마지막 디테일을 고쳐야 합니다. JungleCupCollectionViewController.swift를 열고 setupCollectionViewLayout()내에 다음 값을 변경합니다.
customLayout.settings.headerOverlayMaxAlphaValue = CGFloat(0)
위의 값을 다음과 같이 변경합니다.
customLayout.settings.headerOverlayMaxAlphaValue = CGFloat(0.6)
이 값 headerView에 layout black overlay 값을 할당할수 있는 최대 opacity 값을 나타냅니다.
모든 비쥬얼 효과를 보기위해 프로젝트를 빌드하고 실행합니다. 스크롤 해봅니다! 스크롤!

Where to Go From Here?
여기이 튜토리얼에 대한 최종 프로젝트를 다운 받을수 있습니다.
조금의 코드와 기본 transforms 지식과 함께 완전한 사용자화와 필요할때 미래에 재사용할수 있는 UICollectionViewLayout 를 생성했습니다.
UICollectionViewLayout에 대해서 더 배우고 싶다면 Collection View Programming Guide for iOS의 Creating Custom Layout 색션을 읽기를 권장합니다.